I-CAR guest column: Collision repair diagnostics — the next essential collision repair process
By onEducation | Repair Operations | Technology
Editor’s note: In the latest in an I-CAR column series on industry issues, industry technical support manager Steve Marks stresses and elaborates on the importance of diagnostics and calibration. Essentially, if you’re only using the dashboard light, you’re not delivering a proper repair. Read on for more insight from I-CAR.
By Steve Marks
Would you ever attempt to repair a late-model collision-damaged vehicle without three-dimensional measuring? Of course you wouldn’t. Without measuring, it isn’t possible to determine the extent of damage, or to identify hidden damage – which can impact the safety of drivers and passengers in future accidents.
 Yet, every day, many vehicles are returned to owners with hidden damage because according to technicians, “There isn’t a warning lamp illuminated on the dash.”
Without a diagnostic check, there isn’t a way to identify hidden damage to today’s advanced vehicle electronics and driver assist systems. Especially since there are a significant number of systems that don’t provide a visual indication that there is a system malfunction or history code of some type.
While tools such as self-piercing rivet (SPR) guns and MIG brazing equipment may be new to many of us, scan tools have been available for many years, but few of us have embraced them for collision repairs. To ensure complete, safe, and quality repairs, while improving cycle time, improving CSI, and reducing comebacks, it may be time to take a close look at scan tools; and the incorporation of collision repair diagnostics in your collision repair process.
Vehicle systems
The need for scan tools isn’t new to technicians; we’ve had to leverage them for years to identify fault codes and turn of malfunction indicator lamps (MIL) for airbags, antilock brakes, and traction control systems. However, a lot of that work was sublet to a dealership, or a service provider that specialized in this type of work.
Restraint systems, antilock braking systems (ABS), and traction control systems (TCS) also provided a clear indicator that there was a code that needed to be cleared. With many of today’s advanced vehicle safety and driver assistance systems, that isn’t the case.
More frequently, today’s vehicles are being equipped with collision mitigation technologies: Lane keep assist/lane departure warning, collision warning, adaptive cruise control, 360-degree camera views, and blind-spot warning systems. Many of these vehicle systems require “zero-point calibration” following replacement of system parts.
The majority of the zero-point calibration procedures call for the use of a scan tool. And, oftentimes, it goes beyond just hooking the scan tool up to the vehicle; it may involve driving the vehicle, or other special parameters, such as where the vehicle has to be located for the procedure to work.
A few months ago, the I‑CAR Repairability Technical Support team developed video segments to show examples of zero-point calibration requirements on a 2015 Ford F‑150. Ford Motor Company offers this vehicle with a number of advanced safety and driver assist options. Many of these systems require calibration/initialization following part removal and/or replacement.
For example, in the past, replacing a side mirror on a vehicle was a straightforward process: Remove the damaged mirror and install the new mirror. With Ford’s 360-degree camera option, this is no longer the case. Even if nothing other than the mirror is damaged, a scan tool is required to properly repair the vehicle.
With the 360-degree camera, special calibration mats are required for alignment and the vehicle must be parked “in a flat open area…with a minimum of 6 feet of open space to each side, 7 feet of open space in front, and 11 feet of open space behind the vehicle.”
Additionally, the “area where the alignment is performed must be free of shadows and glare.” However, it’s not quite as simple as just placing the vehicle in the proper location and putting the mats down on the floor next to the vehicle. There are also very specific requirements for where the mats must be placed in order for the diagnostic alignment process to accurately take place. Improperly placing the mats will have an adverse effect on camera system performance.
Once the mats are properly located, following the calculations provided in the service manual, the alignment procedure could begin. The next steps are guided by the scan tool, but if the alignment procedure is unsuccessful, there are several pages of faults that require additional investigation. Keep in mind, all of this is required for just a side mirror equipped with the 360-degree camera option.
Remember, because no two vehicles have the same procedures, OEM service information, coupled with a scan tool, is required every time to do a complete, safe and quality repair.
Diagnostics required?
When are diagnostics required? Unfortunately, this question doesn’t have a simple answer. It will often be based on the age of the vehicle, the type and extent of damage, which options the vehicle is equipped with and their component locations.
Collision repair professionals will have to apply a level of sound judgment to each vehicle that requires repairs; a scratch in the bumper cover of a late model vehicle may not need diagnostic work performed (depending on what’s required to repair the bumper cover), but a frontal collision with multiple airbag deployments likely will.
It is important to note that many vehicle makers require calibration/initialization of advanced safety, and driver assist, systems following part replacement, regardless of the extent of damage. If the repairs being performed include the replacement of sensors, wires, computers, etc. the OEM service information should be referenced to identify if calibration/initialization is required.
To concretely determine if a scan tool is required, you’re going to first need to identify which advanced safety or driver convenience systems, if any, the vehicle is equipped with. If parts of those systems require replacement (or R&I), you’ll then have to consult the vehicle maker service information.
More RDN calibration, diagnostic coverage
- SEMA audience members share insight, issues on getting reimbursed for necessary auto scans
- ‘We gotta quit relying on the dashboard light’: Why scans are more important than ever for collision repair
- Debating need for sensor scans, calibration with insurer? Here’s some OEM, expert guidelines
- With new technology in cars, calibration becomes vital with changes
This part of the process can be a bit challenging. Service manuals aren’t designed for collision repairs; they’re designed for system faults that often result in the customer bringing their vehicle back to the dealership. From my experience, they’re not laid out as intuitively as many of the collision repair manuals are today.
However, with practice, you’ll learn how to best navigate within each OEM’s service information. Once you find the replacement procedure for the sensor, computer, etc. required for your particular repair, there will usually be a link to the calibration procedure. Once you’ve read through the procedures, you’ll know if a scan tool is required and if there are any additional special considerations for calibration.
Tool options
Once you’ve decided to train an employee – or hire one – to be your lead collision repair diagnostic technician, you’re going to need to determine which tool(s) you’re going to leverage. Similar to other pieces of equipment you’ve invested in, you’re going to want to do thorough research to determine which type of equipment is best for you. Again, similar to other tools and equipment, you’ll see that each type has features that work great for you and each has limitations that you’ll need to consider.
Option 1: OEM scan tools work great if you’re primarily working on one or two model lineups. OEM scan tools will offer more in-depth coverage than non-OEM scan tools, but won’t offer you as broad of a range of vehicles.
However, if you don’t often work on multiple makes, you’d still be able to sublet those vehicles to a local dealership. If you want to stick solely to OEM scan tools and have coverage across a large range of vehicle makes, be prepared to make a heavy financial investment.
Option 2: Aftermarket scan tools offer the flexibility to work on a wide range of makes and models, but don’t always offer the depth that OEM scan tools do. These tools are designed to work on OBD-II systems, along with systems that may be more prone to a failure. You’ll want to thoroughly investigate which makes, models, and years these systems will provide coverage for.
I believe you’ll see a lot more aftermarket scan tools designed for collision repair professionals in the next couple of years as I-CAR continues to work with the Equipment and Tool Institute (ETI) to demonstrate the opportunities in the collision repair industry for many of these system calibration requirements.
Option 3: Option 3 isn’t a scan tool – it’s a tool that “talks to” scan tools from Collision Diagnostic Services, which recently unveiled their asTech2. With this tool, which is currently the only one of its kind on the market designed for the collision repair industry, you have access to OEM scan tools through the service that CDS offers.
To leverage the CDS service, a technician connects the asTech2 to the vehicle, via the OBD II port. Next, the asTech2 is connected to the Internet via an Ethernet cable, or Wi-Fi. The technician then goes online to the asTech2 website and submits a service request. A CDS staff member then scans the vehicle, remotely, using an OEM scan tool. After scanning the vehicle, CDS submits a full report to the collision repair facility identifying each, if any, of the fault codes the vehicle has.
Diagnostics and the workflow?
If you’ve incorporated an otherwise robust blueprinting practice into the damage analysis process, you may want to add collision repair diagnostics into that process.
Checking for diagnostic trouble codes (DTCs) during blueprinting may help to avoid “time bandits” (supplements, last‑minute sublets, etc.) later in the process. Checking for stored codes can also identify faults or issues that were pre-existing, possibly having nothing to do with the damage currently being evaluated, but will need to be addressed to provide a safe and complete repair, or at least disclosed so the vehicle owner is aware of the vehicle condition.
By identifying faults early in the process, you’ll be better prepared to deliver on-time, with all repairs completed. Coupled with considering incorporating a diagnostic check into your post-repair inspection process to ensure that nothing was missed, you’ll be able to share documentation with your customer and ultimately help improve cycle time, CSI and fewer comebacks.
Complete, safe, and quality repairs – a leading reason to consider incorporating more collision repair diagnostics into your daily collision repair activities.
Steve Marks is the I-CAR industry technical support manager.
Images:
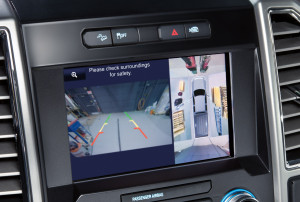
A view from the 2015 Ford F-150s 360-degree camera is shown at right. (Provided by Ford)
Steve Marks, industry technical support manager for I-CAR. (Provided by I-CAR)