Safety inspections, adhesive removal, calibration time: More tips from the DEG
By onAnnouncements | Associations | Education | Repair Operations | Technology
The Database Enhancement Gateway, which allows repairers and insurers to make inquiries and suggestions of the estimating providers at no cost, offers weekly tips for repairers on the Audatex, Mitchell and CCC programs online and through the Society of Collision Repair Specialists’ email list.
If you haven’t used the free service before to submit questions about estimating collision repair work or just browse responses to other carrier and shop questions, check it out. It’s a good way to find IP best practices and help write the most accurate estimates or appraisals possible.
Here’s our latest monthly roundup of areas spotlighted as tip-worthy by the DEG. To receive the tips as soon as DEG releases them, like/follow the DEG’s Facebook and Twitter feeds. (It also posts videos to a YouTube channel once in a while.) Or just browse the more than 15,000 inquiries and responses in the database and see what else you learn.
Safety inspections usually not included
Automakers might require extensive safety inspections following a collision, and estimators and adjusters should be aware that none of it is typically included in information provider labor times.
“The labor to perform these inspections is NOT included unless specifically noted in the footnotes of a component being repaired,” the Database Enhancement Gateway wrote in a tip tweeted Jan. 6. “Some inspections will require selecting components from the database or performing an on the spot evaluation for labor.”
So you’ll have to input the operations manually, regardless of whether you’re charging for them, to provide your customer with an accurate estimate.
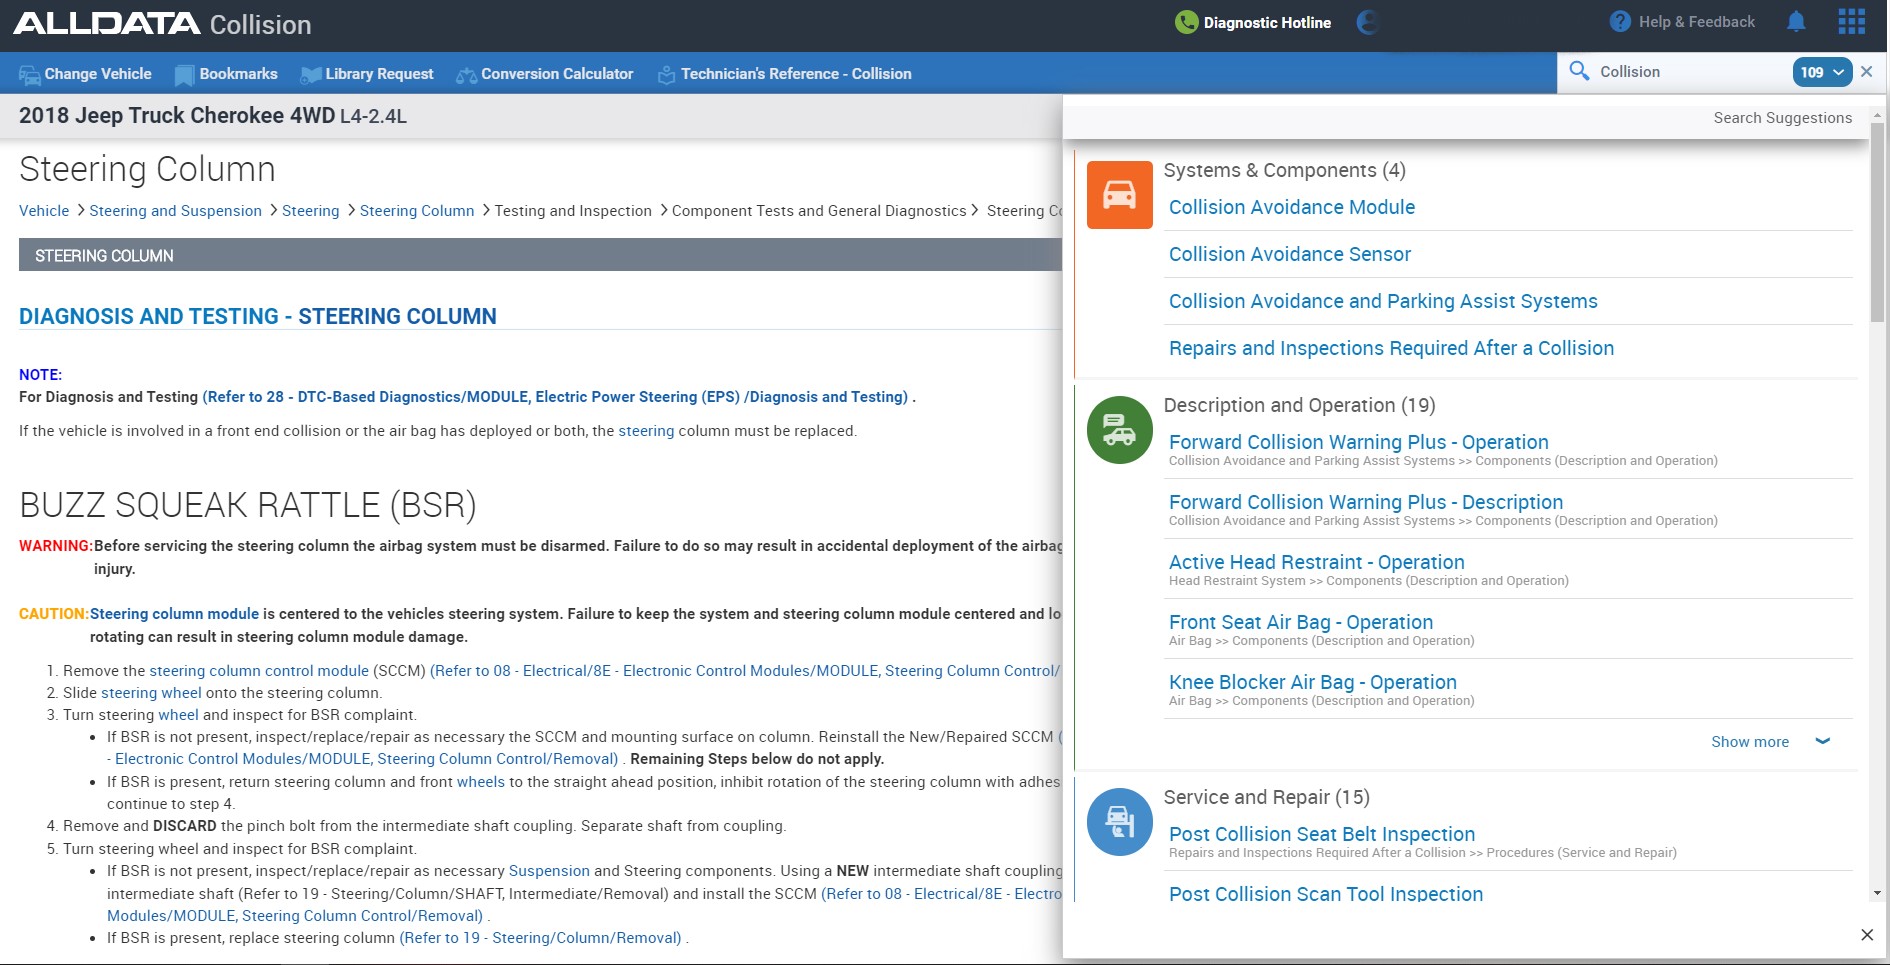
The DEG illustrated such inspections with a screenshot from ALLDATA’s version of repair procedures for a 2018 Jeep Cherokee. Sections include items like “Post Collision Seat Belt Inspection.”
“Required Inspections after a collision are manufacture and vehicle-specific down to the type of impact the vehicle has sustained,” the DEG wrote. “Information on what components need to be inspected and/or replaced after a collision can be found in all the OEM technical websites or using a 3rd party program like Alldata.”
(The usual caveat: Only the official OEM repair procedure sites are guaranteed to be correct. Some instructions might get lost in translation or fail to be updated in real-time within a third-party repair procedure aggregator.)
The DEG also warned that some parts encountered during these inspections might be required to be discarded.
“During ‘INSPECTIONS’ some components MUST be replaced (Clips, fasteners, repair kits, or specific parts) regardless of the type of impact/ collision,” the DEG wrote. “Refer to OEM service information for this prior to finalizing repair planning.”
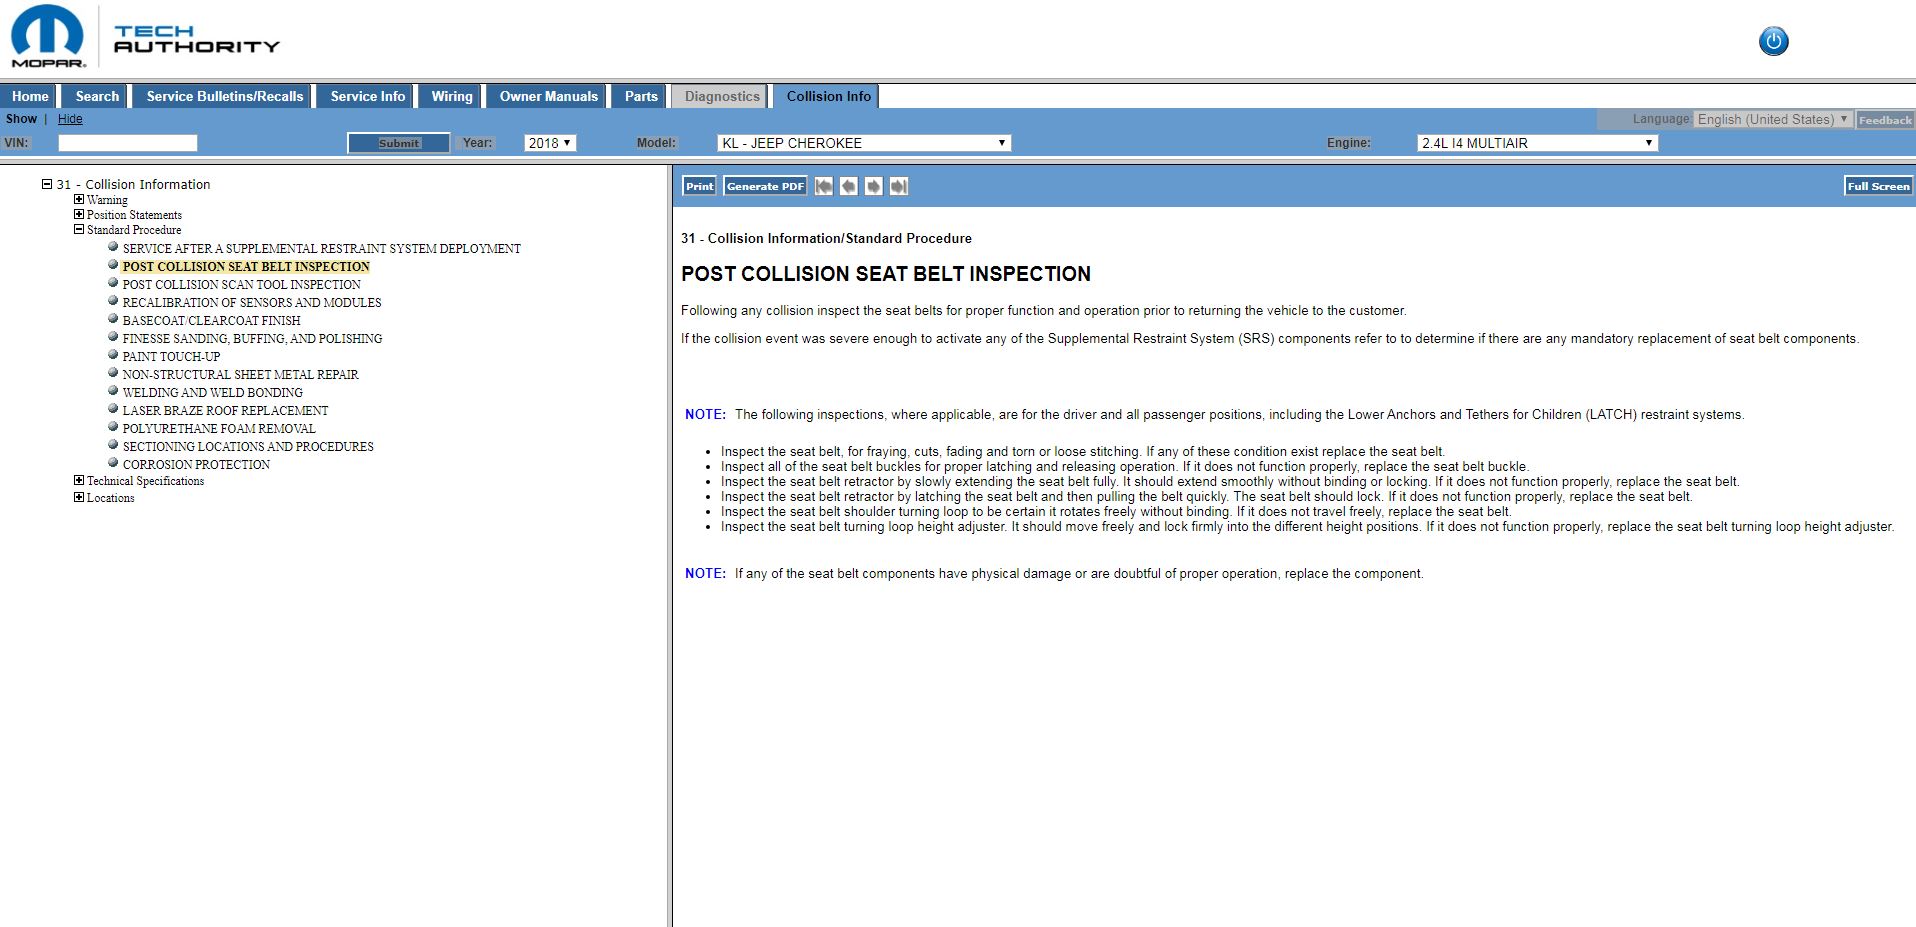
We looked up the official repair procedures for a 2018 Jeep Cherokee 2.4-liter multiair engine. After a crash, seat belt inspections are indeed required. Further procedures might arise if a supplemental restraint system was activated, according to FCA.
“Following any collision inspect the seat belts for proper function and operation prior to returning the vehicle to the customer,” FCA wrote.
It lists a series of inspections and states that they “where applicable, are for the driver and all passenger positions, including the Lower Anchors and Tethers for Children (LATCH) restraint systems”:
• Inspect the seat belt, for fraying, cuts, fading and torn or loose stitching. If any of these condition exist replace the seat belt.
• Inspect all of the seat belt buckles for proper latching and releasing operation. If it does not function properly, replace the seat belt buckle.
• Inspect the seat belt retractor by slowly extending the seat belt fully. It should extend smoothly without binding or locking. If it does not function properly, replace the seat belt.
• Inspect the seat belt retractor by latching the seat belt and then pulling the belt quickly. The seat belt should lock. If it does not function properly, replace the seat belt.
• Inspect the seat belt shoulder turning loop to be certain it rotates freely without binding. If it does not travel freely, replace the seat belt.
• Inspect the seat belt turning loop height adjuster. It should move freely and lock firmly into the different height positions. If it does not function properly, replace the seat belt turning loop height adjuster. (Minor formatting edits.)
“… If any of the seat belt components have physical damage or are doubtful of proper operation, replace the component,” FCA continued.
We also noticed another interesting and important inspection on a page describing SRS-related inspections and mandatory part replacements.
“Following ANY major vehicle impact damage in the vicinity of an impact sensor or the ORC – It is critical that the mounting surfaces and mounting brackets for the Occupant Restraint Controller (ORC), front impact sensors and side impact sensors located within the proximity of the impact damage be closely inspected and restored to their original conditions. Because the ORC and each impact sensor are used by the SRS to monitor or confirm the direction and severity of a vehicle impact, improper orientation or insecure fastening of these components may cause airbags not to deploy when required, or to deploy when not required.” (Minor formatting edits. Emphasis FCA’s.)
Read the FCA OEM repair procedures to determine all other inspections required.
Audatex: Removing panel bond not included
Is there still panel bonding adhesive stuck to something you’re fixing? The DEG advised in a Jan. 13 tweet that the effort to remove it isn’t included within Audatex’s labor times.
Section 4-2 of Audatex’s Database Reference Manual P-pages clearly lists “Removal of panel bonding adhesive material” among not-included operations
“When repairers come across situations where after a panel is removed and the vehicle is left with ‘panel bonding adhesive material’, the labor associated with removing this material in preparation for the replacement part is NOT INCLUDED,” the DEG wrote. “This would be an on the spot evaluation depending on the process, equipment and consumable materials used.”
CCC: Aiming a front distance sensor
CCC might offer a 1.0- to 1.6-hour labor time for aiming a distance sensor, the DEG wrote. But that time doesn’t include everything a repairer might do, the resource pointed out in a tip tweeted Jan. 20.
The issue arose in a Jan. 6 DEG inquiry regarding a 2019 Toyota Highlander. CCC, like the other information providers, doesn’t have a labor time for scanning a car.
The user wondered how CCC could provide a distance sensor calibration time, since this involved a scan tool, and disputed the 1.0 hour of mechanical time the IP did allot.
“Labor Time Premise states the following ‘Due to the variety of scan tools used, both OEM and aftermarket, as well as the variation from vehicle to vehicle and repair to repair, MOTOR is unable to develop a time that accounts for these different scenarios,” the user wrote. “Therefore, MOTOR recommends an on-the-spot evaluation to determine an appropriate estimated time to perform diagnostic scans for each repair.’ Labor time to re-calibrate a Distance Sensor. CCCOne has 1.0M for this operation, we disagree and charge 3.0M. … How did CCC develope a labor time if the premise states they cannot when the use of a scan tool is required for this operation?”
The user provided an extensive list of repair procedures from Toyota relating to the recalibration.
“Change time in CCCOne to 3.0M,” the user proposed. “This is what we have to pay if it is calibrated in a Toyota service department as well.”
CCC initially refused to change anything, declaring “MOTOR assumes that the facility has all necessary tools and equipment in-order to complete any given repair. Subletting repairs must be considered a business decision by the shop.” It also said nothing needed to be removed.

But it ultimately re-examined the issue and bumped the time up to 1.6 hours, offering some clarification into what would and wouldn’t be included:
1. Checking the level of the floor would not be included when a dedicated area is used to perform this calibration. This was done once to determine a dedicated area so it should not be necessary again.
2. Axis Beam confirmation would be included but adjustment is not.
3. The estimated work time includes setup of the Toyota Tech Stream. …
4. The estimated work time includes mapping out the work space.
5. The estimated time does not include any trouble shooting.
6. The estimated work time includes 1 adjustment.
As for the scan tool argument, CCC said the user was taking its words out of context: It was only referring to the specific operations of running a pre- or post-repair scan.
Mitchell: Clear coat extension
The DEG in a tweet Jan. 27 addressed the issue of calculating clear coat extensions in Mitchell. It drew readers’ attention to Mitchell’s Collision Estimating Guide, which explains:
In some applications, it may be required to extend the application of clear to the nearest panel edge or breakpoint.
The performance of this operation is NOT INCLUDED in the Mitchell refinish labor time.
The extension of clear coat formula is intended to be calculated as a percentage of base refinish hours excluding overlap.
It DOES NOT APPLY to edges, jambs, and undersides. No deduction for overlap should be taken.
NOTE: When calculated, 20% of the total time should be allocated to the clear coat line item. The total sum of the line and the amount allocated to the clear coat line will total 50% of the exterior refinish time for the panel being refinished.
Example: A panel refinish time is 2.0 hrs. When extending clear, the refinish time for that panel should be 1.0 (.5 per refinish hour). For clarity, the refinish line should be displayed as .8 and .2 (20%) should be allocated to the clear coat line. (Emphasis Mitchell’s.)
The DEG suggested estimators should take advantage of Mitchell’s automation here.
“We suggest using the ‘BLEND’ selection for any panels requiring this step to ensure properly calculation of the allocated PREP and CLEAR application formula as the system will automatically allocate the 80/20 split of the 50% formula,” the DEG wrote.
“Note: This formula is not intended to be used on repaired panels or any panels that require additional labor to repair pre existing surface conditions.”
Have a question?
Have a question about AudaExplore, Mitchell or CCC? Submit inquiries to the DEG here. Inquiries, like answers, are free.
More information:
Images:
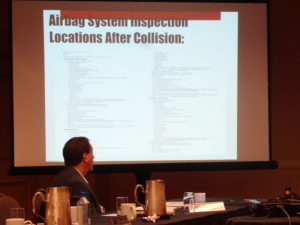
Some of the possible inspections required on a 2019 Subaru Ascent after a collision are shown in this slide from a July 24, 2019, Society of Collision Repair Specialists open board meeting. (Subaru procedures in SCRS slide; photo by John Huetter/Repairer Driven News)
A screenshot of ALLDATA instructions for a 2018 Jeep Cherokee references a post-collision inspection. (ALLDATA screenshot provided by Database Enhancement Gateway)
FCA repair procedures for a 2018 Jeep Cherokee with a 2.4-liter multiair engine are shown. (Screenshot from Tech Authority)
A 2019 Toyota Highlander Nightshade edition is shown. (Provided by Toyota)